Friday, October 1, 2010

Lego Robotics team logo

It's been almost half a year since I've posted anything (mostly due to the long transition from windows Vista to 7), so I finally got around to finishing a render I don't hate.

Using this tutorial on neon lights, I made a simple logo for a Lego Robotics team I am mentoring - E-Race.


(Render size: 1600 by 1000)

Thursday, May 13, 2010

Tutorial: How to make Liquid - Still life liquid

In this tutorial, I will teach you how to make Liquid Animations.

CLICK ON THE IMAGES TO ENLARGE! 
It will show you where to navigate to!

Part 1: Objects
This is a basic setup of liquid. You can change these objects if you want, but I recommend following through once the whole way.


Delete your cube

Add a cylinder (Space-Add-Mesh-Cylinder) with standard settings.

Move the Cylinder up 8 spaces (G-Z-8)

Add a plane (Space-Add-Mesh-Plane)

Scale the plane by 10 (S-10)

Add a cube (Space-Add-Mesh-Cube)

Go into Wireframe mode (Z)

Scale the cube by 10 (S-10)

Move the cube up 10 (G-Z-10)


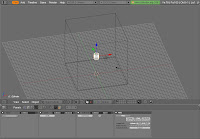
^ This is what it should look like. Note: there is a plane there, but you can't see it because its inside the cube wall.

Part 2: Physics
Now we change the settings for these objects.

The Cylinder:
Select the Cylinder and go to Object (F7). Than go to Physics Buttons (No hotkey) and select (from the far right) Fluid, than again from the sub-menu, Fluid

This will, after baking, make the area inside the cylinder a liquid.


The Cube:

Select the Cube and go to Object (F7). Than go to Physics Buttons (No hotkey) and select (from the far right) Fluid, than Domain

This will make the cube the area wherein the fluid will render. Any fluid that would go outside the area of the cube will hit an invisible wall.


Part 3: Bake

Now, with the cube still selected, press Bake

Kapow! Suddenly your screen freezes, the cube vanishes, and a gray blob falls from the cylinder only to vanish or shatter (depends on the computer). What went wrong?!


Answer: Nothing. Once your screen unfreezes or you press escape to cancel, you can scroll through your animation using the arrow keys. You can render your current frame at any time. It won't look like fine art, but with a little tweaking it should look very smooth.

Part 4: Tweaking

There is a very useful thing you can do when you select either the cube or the liquid (the liquid now counts as the Domain object - you can move the cylinder if you want because it serves no purpose); You can change the resolution of the liquid.

Next to the Bake button, there is a Resolution button (res) that defaultly says 50. You can change that to be higher and your liquid will re-bake (by clicking Bake again) to a higher resolution. If you change this to be too much higher, it will take longer to bake. My wine glass render (Res was at around 80) took up to 2 minutes a frame, and the full animation took around 3 hours.

You can also set the object to Smooth just as normal, and material settings also apply.

Part 5: Changes

Simply put, you can only have 1 domain, but you can stick as many fluid objects as you want in the render. Also, none of the objects have to be in the shape that I used them for in this tutorial. You could stick two tubes of liquid at opposite ends of the domain and watch how the fluids interact, for example. It'll just take a long time to bake.

Part 6: End Notes

In my next installment of this tutorial, I will show you how to export animations as Movies that you can upload to flickr. I will use this tutorial's results as the base of the next tutorial, so save anything you would want to view as a video.

Tuesday, May 11, 2010

Glug Glug Glug


Originally uploaded by LegoManJosh
An animation of wine. The meshes were impossibly easy to make because of the spin tool ( Love it ), and the whole thing took around 3 hours to render fully from frame 43 to 280.

~ Josh

Thursday, May 6, 2010


Hello all! today i will be showing you how to make a simple animation of a block.
Enjoy!


(1) Select add-mesh-plane and place it directly under the default starting block. Select numpad 1 which will give you the view in the above picture(note: you cant see the plane at this point, but it is still there). Then press the letter "I" a list should come up, on the list click on "LocRot" which saves the Location and Rotation of the block.


(2) Next, change the frame value(see above) to 50.


(3) Hold down ctrl and move the block up 1 square. Then, turn it 45 degrees to the right.(see above picture) after doing this press the letter "I" on your keyboard, click on "LocRot" again.
What you can do now is split the blender screen into two segments, the first being your block, the other change the window type to "IPO curve editor" what you have now should look like this:


(4) Now with all that said and done, change the frame value to 100. then turn the block 45 degrees to the right again, move it right one more space, then down one space. Then press "I" and LocRot again, you will see the IPO curve editor window change. It should look like this:


(5) Now change the frame value to 150, then move the block left one space. then press "I" and LocRot again.

(6) Now click on the red button to the left of LocX on the right of the IPO curve editor window(see first picture). After doing this, click on Curve--Extend Mode--Cyclic, which is at the bottom of the IPO Curve Window (see second picture).


(7) Now repeat the exact same thing with LocY, LocZ, RotX, RotY, and RotZ. Basically what you are doing is making the animation repeat itself over and over. The end product should look like this: (this is a slight zoomed out view).


(8) Now that everything is programmed, we can now save the animation into a video file, but first we should look at how to set a duration for how long the animation keeps repeating. press F10 on your keyboard and a new menu on the bottom should show up. Then, you will see "End" in the "Anim" panel. The default value should be 250.


(9) You can also see to the right of "End", in the panel "Format" their is a selection called "FPS"
which means "Frames Per Second" the default should be 25. Basically, it means that ending at 250 frames at 25 frames per second, you would get a 10 second animation. This should be fine.

(10) Now, for saving the animation. You will see right above the "FPS" option their is a "Jpeg" option, this option is basically choosing a format for which to save your animation. Click on it and choose a video file to save it as (example: Quicktime, AVI, etc.). I personally use Quicktime.

(11) Now, we have to choose a place to save our animation, select the folder all the way to left. Its default saved folder should be "tmp"(see picture below). To save it elsewhere click on the folder icon to the left of "tmp" and choose an easy to access area of your computer.


(12) Now, all you have to do is click on "ANIM" and then wait(see first picture). But before doing so you should set the percentage to about 25% to 75% (see second picture). This simply makes the saved video bigger or smaller, and saves more time on saving the animation.


Well, thank you very much for taking this tutorial, i hope it went well for you!
~Nolan

Wednesday, February 24, 2010

How to light a model: Part 2

More about Lamps

In the second part of my lighting tutorial, we will take a closer look at the types of lights in blender.
Please note: I am not a master at blender, nor do I pretend to be. I will not be covering everything about every type of light. Just the basics for the lights that I know how to use effectively.

To jump to Part 1, click here.

There are 5 types of lights; Lamp; Area; Spot; Sun; and Hemi. All of these lamps are useful for different types of renders.

All of these lights can be added or changed in 2 ways.
  1. Selecting your lamp, go to the Material Settings (F5) and change the lamp from there. More about this later.
  2. Press Space/Add/Lamp/ and select your light from that sub-menu
 General Lamp Settings

Some settings are available for all lamps. 
Energy
 The "energy" slider controls the amount of light that the lamp emits. This is usually one of the more commonly changed settings when making a complicated scene.
Layer
 The "layer" button is a useful option that makes the lamp cast light only on objects of the same layer. This works even if multiple layers are visible.
Negative
 Makes the lamp into a "black hole" that sucks in all light. Effective for making shadowy corners and other dark areas.
No specular
 Makes the lamp not cast shine on objects. Very useful for fill lights.
Color 
 Changes the color of the lamp. Represented by the (usually) white box.


Types of lamps


Generally, I don't use the Area or Hemi lamps much. I know a bit about them but not enough to write an article on them. Sorry. I will cover the  Lamp, Spot, and Sun lamps.


Lamp
the "Lamp" lamp is the most simple of lamps. It projects light in all directions and is very versatile. I use this lamp for general lighting and for objects such as Streetlamps.
Useful Settings
"Sphere"
Sphere basically makes a large visualized ball around the light that shows you when the light "drops off". You can change the "Drop Off" point by changing the "dist" (default  is 30). This is useful for making nighttime scenes where you want far-off objects in shadow.

Spot

The "Spot" lamp is a useful lamp that lets you illuminate a single round or square area. You can think of it like a stage light. Spot lamps are good for illuminating a single object without casting extra light on surrounding objects.
Useful Settings
"Halo"
this setting makes the projection of the light visible. For example, a shaft of light coming from an alien spacecraft to pick up cows would have a "halo".
"Square"
This setting changes the round illuminated area to a square illuminated area.
"SpotSi"
This setting changes the diameter of the illuminated area.

Sun

The "Sun" lamp is basically an imitation of our real sun. It provides light to all objects as if it were infinitely far away. All of the objects illuminated are illuminated from exactly the same angle. It's kind of hard to describe, so see the render for a visual representation.
 IMPORTANT: The direction of the lamp (the dotted line) is the direction the sun is pointing, or the direction all objects are illuminated from.


Example renders

The below renders are here to show confused viewers the visual uses of the lamps I covered today.

Stage-light
The stage-light in this scene is using a spot light (with halo settings) to cast an illuminated beam of light onto the "stage". A very simple render to make, with satisfying results. The stage/background was made from a large number of extruded planes to make a roughly boxy background. Note: the ambient light you see is the product of another lamp, not the spot lamp.


Sun example


 No, this is not a render. But I think that it clearly shows how the sun lamp (though in the center) illuminates the sides of the objects that would not normally be in light.


I do not have an example for the "lamp" lamp because I'm pretty sure that most people get the general idea. Basically, it acts just like a normal light, casting illumination in all directions equally.

I hope you have enjoyed my tutorial. Here is a link to the first part of this tutorial.

Tuesday, February 2, 2010

How to light a model: Part 1

Introduction to Lighting

Here is a link to the second part of my tutorial.
 
Lighting models is probably one of the more important aspects of Blender. If the lighting is laid out badly, than models lose detail and therefore look less appealing.


Their are many parts to lighting a model; the location of the lamp(s); the type of lamp(s); the energy of the lamp(s). In this tutorial, we will cover the more basic ways to light a model; the 3-point lighting system.
[Right: the default lighting setup]


The 3-Point lighting system
 
The 3-point lighting system is one of the most commonly known lighting system used by photographers and 3D artists. The system is based around the use of 3 lights: 1 "primary" light that is used as the main light source; 1 "fill" light which is placed on the other side of the object than the "primary light"; and 1 (optional) "backside" light, which is placed behind the object to light it from behind.
[Right: the standard 3-point lighting system]


"Primary" Light
In blender, I use the primary light with the default "lamp" settings: 1.000 energy; standard stuff.


"Fill" Light

The fill light is used to show the detail of the other side. I set the settings for it with around 0.6 energy, and use the "No specular" option. "No specular" is a useful option that makes it so the lamp will not make any "shine" on its objects. It is not noticeable most of the time, but it does a lot to help the model with some renders.


"Back" Light

The back light is a very optional lamp that is used to light the back of a model. I don't usually find it necessary unless I'm using mirrors. The settings for the back lamp are very similar to the "fill" lamp, the only difference being that I set the energy to around 0.4 instead of 0.6.


Here is a link to the second part of my tutorial.

Tuesday, January 26, 2010

Book Statue

Recently I came across a contest for designing a logo for a book award (the Teen Choice Book Award Logo Contest) and decided to enter with my favorite medium: Blender.
As of now the results are not in, and I do not expect to win, but I think that it is still a good render.

~ Josh